Showing posts with label DIY. Show all posts

Upcycled Noticeboard

Sunday, 31 March 2013


Aloha! So last Friday on my first day off from work I decided to deep spring clean the kitchen! Cray cray, right!? While tidying up the dumping corner I rediscovered my whiteboard behind a million papers and cook books looking rather sorry for itself - I decided to rehome it and give it a sparkling makeover :)
 
I took it up to my craft room and raided my drawer of Washi tapes (seriously, you NEED washi tape in your life!!) and within 5 minutes I had recovered the bland wooden frame and turned the noticeboard into a cute shabby chic floral masterpiece.
 
I also gave it a brand new home within our kitchen! Previously it had just been propped up against the wall on the work surface and would either keep sliding down or get hidden behind junk. I used a set of Command Strips and pinned it to the side of our fridge - ideal to keep track of meal plans and add to a shopping list while we're rifling through.
 
And voila! a very inexpensive way to upcycle a dull noticeboard.
 
 
What's the best use you've found for Washi tape?


Makeover

Saturday, 16 March 2013


After careful deliberation and being on and off hiatus for just over a year i have decided to take this blog forward in a slightly new direction.
 
That can only mean one thing! ... A MAKEOVER!!
 
So tadaa!! Welcome to my all new blog!
 
Apart from the visual aesthetics of my blog undergoing a makeover (thanks to the very talented Kayla) i have also renamed my blog to fall in line with my new craft store.
 
Kirsti @ the Notebook is now ... and pictures on my wall.
 
Since fleeing the family nest and moving in with my boyfriend, fashion and beauty has taken a back seat. I am still very much interested in these things and am still reading your blogs daily but for me personally my priorities have changed. I have taken on the role of housewife (while still working a 9-5!) and am relishing my new role. I’ve learnt to cook! I DIY (well, i DIY’d before as my full-time job requires these skillz) and am a proud step-mummy. I find myself reading home decor magazines and searching for new recipes rather than picking up a gossip mag or trying to hunt down the latest MAC collection.
 
So with that in mind i have decided to move forward with a more lifestyle & home based blog (while incorporating some of the ol’ favourites like reviews, DIY/handmade projects, etc). I will also be using this space to showcase some of my crafty wares that i recently launched.
 
I would love to hear from you - I’m looking for feedback on my craft items, guest bloggers (whether it be showcasing your handmade items, recipes, DIY skillz, etc) and general chit chat about what content you’d love to see around here now on 'and pictures on my wall'.

I'm sure you've all heard by now but Google Friend Connect is departing us and while I'm a little annoyed about this I have embraced some new tools to help you guys follow me easily so you don't miss any of my updates!

You can follow me via Bloglovin' (don't forget you can import all of the blogs you follow on GFC by going to this link!), Hellocotton and NetworkedBlogs. You can also find the easy 'Follow me' icons down the left-hand side of my blog!
 
I do hope my you stay around and join me on this new journey, take care for now ...


Cooking with Kirsti #2

Thursday, 6 December 2012


Why hello there!!

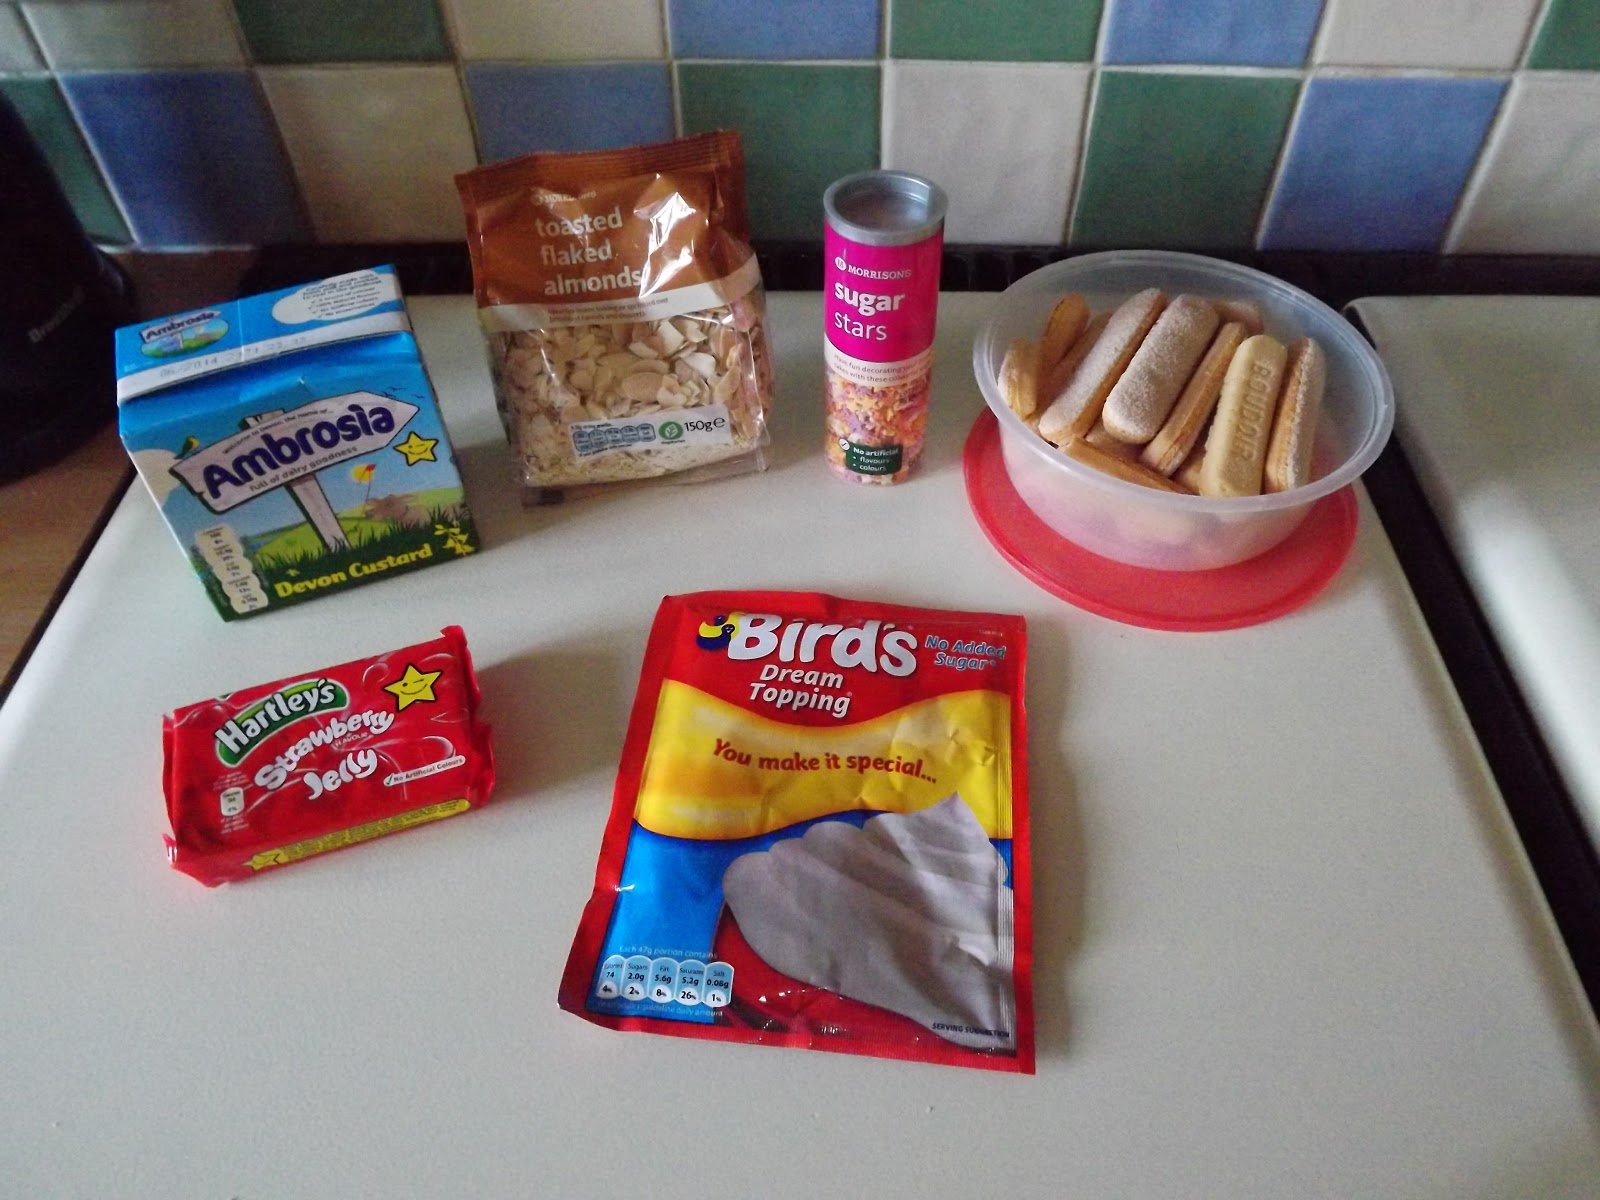
Another installment of Cooking With Kirsti ... today (well Sunday!) i made my first ever trifle. Decided to give myself a head start and do a practice run for Christmas Day. Very easy to do, so i'm pleased with that :) Here's what i did ...

Ingredients:
 
Jelly (strawberry)
Sponge fingers
Custard
Dream Topping
Flaked Almonds
Dark chocolate
 
Firstly i took my trifle bowl (i say trifle bowl, i don’t actually own one yet! I had to buy this Pyrex bowl when buying the ingredients as that’s all they had, lol) and laid sponge fingers over the bottom of the bowl as a base ... i think when i make this again i may use different sponge instead of the fingers but that’s purely for aesthetic reasons.

 
I then made up the jelly and poured over the sponge base. The sponge fingers then rose and mixed in with the jelly. At this point you could add some fruit pieces to the mix but i forgot to buy fruit when shopping! I left this overnight to set in the fridge.

 
The next day i poured a carton of custard over the jelly and sponge. As mentioned in my first cooking post I’m a lazy cook so i bought pre-made custard, you can make your own if you wish (and have the time!)

 
I then mixed up the Dream Topping. I have never even heard of Dream Topping before, my mum always uses whipping cream with icing sugar for the topping of a trifle but the boyfriend insisted i made it the ‘proper’ way so i hunted it down and gave it a whirl. O.M.G !! Why have i never tried this before, it was absolutely amazing ... i even licked the bowl!

 
To finish I quickly crushed up some flaked almonds and made some dark chocolate shavings and sprinkled over the top. I then left to set for a couple of hours in the fridge and viola! A simple, pimple trifle!
 
 
What trifle tips do you have?
 
xoxo
 
 
Photobucket

Cooking with Kirsti #1

Wednesday, 28 November 2012

Lets rewind the clock 12 months shall we!

I was a very undomesticated chicka spending my time between living at home with my parents and living out of a bag at the bf's. Now i have my own place, do all of the cleaning (yep that's right Samuel i have named and shamed you :p ) and have some cooking skillz which have appeared from nowhere!

I'm hoping to share some of my cooking accomplishments here on the blog - the majority of them will be simple and quick #winfortheworkinggirl

Today we have Sausage Casserole:


Ingredients:

Sausages
Onions (I used 1 large white and 1 small red)
Peppers (Green, yellow, red)
Mixed Mediterranean veg medley (not pictured)
Herbs (Mixed herbs and basil)
Stock pot (not pictured)
Gravy granules (not pictured)
Casserole mix

I decided to use the slow cooker to cook the casserole as i put this on at about half 10 in the morning after breakfast one Sunday and did the housework while it was cooking, by the time i had finished a top to bottom clean it was lunchtime and ready to eat, yum!

Firstly i cooked through the sausages in the oven for 20 mins.

I get very confused with slow-cooker cooking. I have a cookbook dedicated to cooking all things slow and it always says to cook the meat and veggies first - surely this defeats the purpose of the slow-cooker!?

Anyways, while the sausages were cooking i chopped up the onions and peppers and fried them off on the hob until soft and then added them to the slow cooker.

I then added a handful of frozen Mediterranean vegetables, herbs (i used a shake of mixed herbs and a pinch of basil), a Knorr stock pot, a tablespoon of gravy granules (Bisto Best), 300ml of water and the contents of a Casserole mix packet (this was in fact a lamb version that you are meant to shove in a bag and cook in the oven but I'm a maverick and don't follow the rules :p )

I then added the sausages and stuck the slow-cooker on medium. It then cooked for around 3 hours; stirring occasionally.

I served this with Yorkshire pudding boats but #bloggerfail i didn't take any final pictures!

You may notice that some of the ingredients aren't pictured - I'm one of those cooks that scours the cupboards as they go seeing what else they can throw in or needs using up :) anyone else do this!?

It was a rather scrumptious dinner, albeit a little bit cheating with the packet mix but hey-ho ... I'm a busy gal ;)

Hope you enjoyed my first cookery lesson - let me know if you'd like to see more :)

xoxo

Photobucket

Somethings Been Making Me Blue ...

Tuesday, 27 December 2011


... just casually drying my hair on the radiator, as you do ...


... pre-dye ...


I had been toying with the idea of putting colour in my hair for a while but couldn't decide whether to do streaks or tips. One thing for certain was it was always going to be a turquoise blue, a colour i hadn't had before and had been lusting over for about a year!

I decided to take the plunge when i saw Zoe's post - i had a set of hair extensions that i rarely used, the brilliance of using extensions is that if it messes up then its not a dramatic loss as with your own hair.

My extensions were inexpensive. I picked them up on eBay about 2 years ago for £24. I used shade #613 which i believe is 'Lightest Bleach Blonde' and it matches the ends of my hair perfectly! The ends of these extensions were quite thin, wispy and rat tail-y so i got my hairdresser on and gave them a trim with some nail scissors, ha.

I bought my dye from eBay too - i opted for Directions Semi Permanent hair dye in Turquoise and it was about a fiver for a 88ml tub.

I'm not going to give you an in-depth, step by step guide on how to dye your extensions as the gorgeous Zoe covers that well in her post (i followed most of her guide ;) thanks Zozo!)

I left the dye on for longer than the instructions say (15 - 30 minutes was recommended, i left it on for an hour and 15 minutes!), mainly because i completely forgot about them and started cooking lunch, ha. The colour is more blue than the greeny turquoise id have liked but as the dye is semi-permanent i can simple wash the extensions a few times until the dye begins to fade to my desired choice :)

I love the results and have worn these a few times to gigs and nights out since dying them 2 weeks ago. I love the length of them too and really wish my hair would hurry up and grow that long!

I've already began scouring eBay for another set of extensions as i have a much more softer coloured look i want to try out next, so watch this space ;)

Disclaimer: All photos were taken with my iphone so sorry if they're a little fuzzy. Normal picture quality will resume when my new camera arrives ;)

What do you think of the blue tips? Would you dare to wear a bright colour?

xoxo

Photobucket

Guest Post: Cat Litter Face Mask ...

Tuesday, 20 September 2011

Hola Senoritas

I'm so excited to bring you today's post by Rosie from The Budget Beauty Book. I'm an avid reader of Rosie's blog, she's a girl after my own heart with her cost-saving ideas and budget buys and below we have a super unique DIY face scrub for you to try ...

Hello lovely people!

I was so excited when Kirsti said she was looking for people to write some guest posts for her while she was away, I’ve been a lover of her blog for some time now so this is so lovely for me!

For those of you who don’t read my blog I basically set out to find the cheapest ways to make myself look and feel beautiful. So I thought I would share with you one of my newest DIY face masks that is making me all giddy and excited!

I recently ran out of my clay face mask and as I’m doing Project 10 Pan I couldn’t go out and buy a new one so I set out to find a way to make my own without spending too many pennies.

So what are we using as our clay you may ask? Cat Litter. Yes you heard me right. Cat Litter.  Before you get all grossed out and stop reading let’s hear some science stuff to help explain….

Cat Litter is made out of a type of volcanic clay called Bentonite. This clay is hydrophilic which basically means that it loves water! It therefore has a negative charge so it draws all of the gross toxins in our skin, so when we remove the clay it takes all of these things with it leaving skin purified and detoxified. Convinced yet?

This mask is amazing for all types of skin as it can visibly help reduce acne, wrinkles and the size of pore amongst many other things! But it is particularly good at helping combat oily skin. You must be convinced by now?!

So here we go! How to make your own cat litter face mask….


You will need:

Unscented Cat Litter

A Glass of Water


A Tablespoon


A Bowl


Any Additional Oils e.g Olive Oil, Lavender Oil (Optional)


1.       Place 2 tbsp of Cat Litter into your bowl, if there is large grains in there it may be a good idea to break them down slightly. This can be done by taking your spoon and pressing down firmly on the litter with the back of it.


2.       Start to add water a little at a time. The clay can take up large amounts of water so it’s important not to do this too face to allow this to happen. We want it to have a muddy consistency, don’t be afraid to have a little excess water in the bowl, that’s a good thing!


3.       Now you can add any extra oils or the like to your mask. I personally add a little olive oil and few drops of lavender oil. Be sure to mix it all in well after!


4.       Now it’s time to apply the mask! Remove your make-up, wash your face with warm water and pat your face dry. Now apply the mask evenly all over your face and leave for 15 minutes until it dries. Wash it off and VOILA, super smooth and amazing skin. Not what we would expect from cat litter eh?


So there you have it, something a little different for you all.

Thank you so much for letting me write a post for you Kirsti!

* A massive thankyou to Rosie - who's gonna try this? *

xoxo

Photobucket

Orchestra of Wolves ...

Wednesday, 27 July 2011

Quick OOTD for you from Saturday.

We went to see Gallows for the second time this month and it was Frank Carters last show *big sigh and even bigger sad face*

The gig was awesome! It was super hot, super sweaty and the only alcoholic drink available to me was JD & Coke * oh hai there super cool rock chick, ha *

This is what i wore:


soz, the picture quality is not its best, i blame the photographer * thanks bf! *


Leather jacket - Primark
Grey eagle vest - Primark
Leggings - super old and holey * adds that rockstar edge ;) *
Biker boots - eBay
Tassel bag - New Look


Leopard nails - Barry M's Mushroom
Skull ring - eBay (it broke as i was getting ready :( still wore it though!)


Ok, so something different happened to my hair and i not quite sure what went wrong right.

As usual i backcombed, then sprayed a generous amount of Backcomb in a Bottle and then added Schwarzkopf's Volume powder for added texture and BOOF! my hair exploded in all its former emo glory!


loved it!!


So there we have it! Another quick OOTD with added Hair, Face and Nails of the Day thrown in, ha.

I also picked up a new Gallows tee at the gig but the one i wanted was only available in XL so i purchased in the hope of making this into a funky dress! .... If anyone has any cool (and easy!) ideas how i could go about this then please let me know :):)

xoxo

Photobucket

DIY: Studded pumps

Sunday, 22 May 2011

Hey gorgeous girlies!

As you may know i like to be a bit creative and customise stuff where possible (last seen here), i have lots of studs left over from my last venture and while sorting out my shoes the other day i came across these pale pink pumps from last summer.

I think i only wore these a couple of times last year as they are quite girly and i like to add a rock edge to my outfits so wearing these with girlie dresses just wasn't me. So when they fell out from a shoe tsunami i instantly thought of my leftover studs and added them to my to do list. Finally got round to customising them this evening and this is how they turned out:

Before:


During: 


After:


What do you think? Do you customise your stuff? I'd love to see what you do :)

xoxo


Photobucket
Made With Love By The Dutch Lady Designs